- Published on
Angular text adventure, part 2: The command parser
- Authors

- Name
- Keith Dechant
This post is the second part of a series about rewriting the classic Interactive Fiction meets CRPG game, The Wonderful World of Eamon. The original game was a text-based game for the Apple II. My rewritten version, Eamon Remastered, has been brought to the modern day and now runs in a web browser thanks to the magic of Angular 2.
For background on the project and the world of Eamon, see Part 1 of the series.
Getting player input
Interactive fiction games need to accept input from the player and do something with it. Usually, this is a simple text prompt where the player can type their command, coupled with a text parser that tries to figure out what a command like "north", "open door", or "give book to eddie" means.
Classic Eamon on the Apple II had a very simple parser, with most commands being two or three words. The command prompt had a couple simple but useful features:
- Hitting return on a blank line ran the previous command again. Useful in those long hallways and in battles where you need to attack the same monster again and again.
- It supported partial word matches, like "op ch" for "open chest"
When I started working on Eamon Remastered, I wanted to give the user experience an upgrade. So I thought I would steal an idea from modern operating system shells, and provide a way to scroll back through the history.
My new command prompt is built in Angular 2 and has the following features:
- Up and down arrow keys allow scrolling through past commands, just like in your Bash shell on your laptop
- Hitting Enter on a blank line runs the previous command, as in the original
- The HTML text input box has a placeholder showing the previous command, to indicate to the user which command they will run by hitting Enter
- Partial-word command matching works as in the original (but is not covered this post)
To do this, I made the player prompt into an HTML text box and used some Angular magic to listen for certain key presses, notably the "Enter", "Up" and "Down" keys.
To start with, we'll build a couple very simple Angular components:
First, the outer adventure.component.ts has a simple template:
<history [history]="game?.history"></history>
<command-prompt [game]="game"></command-prompt>
This contains two components: the history component, which shows the output of the game, and the command prompt component, which provides the user input box.
You'll also notice a couple of objects which are bound to these components. The "game" object is a singleton which contains the game state and logic. It's a container for several other objects, including the "history" object, which keeps track of the previous history entries.
Keeping Track of the Game History
The game.history object is an instance of the HistoryManager class. It (and its helper, HistoryEntry) are defined here:
export class HistoryManager {
  history: HistoryEntry[];
  index: number;

  constructor() {
    this.history = [];
    this.index = this.history.length;
  }

  /**
   * Pushes a command onto the history
   */
  push(command: string) {
    this.history.push(new HistoryEntry(command));

    // reset the counter whenever a command is added.
    this.index = this.history.length;
    this.total_delay = 0;
  }

  /**
   * Pushes some output text onto the history
   * @param {string} text
   *   The text to output
   */
  print(text: string) {
    this.history[this.index - 1].push(text);
  }

  /**
   * Gets the most recent command the user entered
   */
  getLastCommand() {
    if (this.history.length > 0) {
      return this.history[this.history.length - 1]["command"];
    } else {
      return "";
    }
  }

  /**
   * Gets the next-older command in the history.
   * Used for recalling the history with the arrow keys.
   */
  getOlderCommand() {
    if (this.index > 0) {
      this.index--;
    }
    if (this.index >= 0 && this.index < this.history.length) {
      return this.history[this.index]["command"];
    } else {
      return null;
    }
  }

  /**
   * Gets the next-newer command in the history.
   * Used for recalling the history with the arrow keys.
   */
  getNewerCommand() {
    if (this.index <= this.history.length) {
      this.index++;
    }
    if (this.index >= 0 && this.index < this.history.length) {
      return this.history[this.index]["command"];
    } else if (this.index === this.history.length) {
      // reached the newest command. clear the field.
      return "";
    } else {
      return null;
    }
  }

}
export class HistoryEntry {

  public command: string;
  public results: any[] = [];

  constructor(command) {
    this.command = command;
  }

  public push(text: string) {
    if (text === null) {
      text = "";
    }
    let split_text = text.split(/\n/g);
    for (let i in split_text) {
      this.results.push({ text: split_text[i] });
    }

  }

}
The HistoryManager contains an array of HistoryEntry objects, each of which contains the command the user entered, and the output from the game.
This is all displayed in the history component in Angular:
import {Component, Input, AfterViewChecked} from "@angular/core";
import {trigger, state, style, animate, transition} from '@angular/animations';

@Component({
  selector: "history",
  template: `</pre>
<div class="history">
  <div class="history-entry">
    {{entry.command}}
    {{line.text}}
  </div>
</div>
  `,
})
export class HistoryComponent implements AfterViewChecked {
  @Input() history;

  public ngAfterViewChecked() {
    // scroll the history box
    let hist = document.querySelector(".history");
    if (hist) {
      hist.scrollTop = hist.scrollHeight;
    }
  }
}
This component just uses a couple of nested *ngFor loops to display the output, and the text itself is styled using CSS.
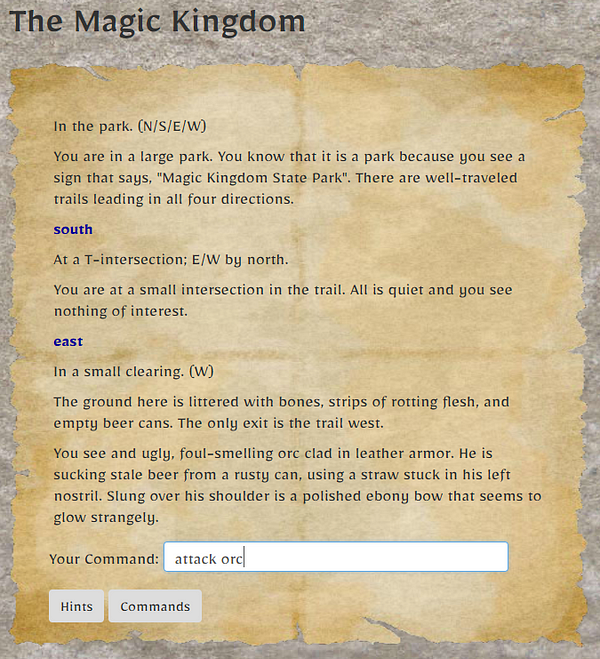
The Eamon Remastered command prompt in action
The whole thing is then wrapped in <div class="history"> which is a box with a fixed height. It contains the entire history since the player entered the game. This caused a bit of a problem: as the history gets longer and longer, the player would have to scroll down after each command to see the latest output.
So, I used Angular's AfterViewChecked interface to help with this. When the view changes, I use a bit of TypeScript in the ngAfterViewChecked() method to automatically scroll the box all the way to the bottom.
There is no built-in Angular method to scroll a DOM element, so this did require a bit of direct manipulation. I try to avoid using things like document.querySelector() when possible, but I couldn't find a better way in this case.
The Command Prompt
Now, on to the command prompt itself. This is a second Angular component in its own file, command.component.ts:
import {Component, Input, ViewChild, ElementRef, Renderer} from "@angular/core";

@Component({
  selector: "command-prompt",
  template: `
    <div class="form-inline">
      <div class="command-prompt form-group" *ngIf="game.active">
        <span class="prompt">Your Command:
        <input #cmd (keyup)="onKeyPress($event, cmd.value)"
         type="text" class="form-control"
         [(ngModel)]="command"
         name="command"
         placeholder="{{last_command}}"
         autocomplete="off"
         />
      </div>
    </div>
    `,
})
export class CommandPromptComponent {
  @Input() game;
  @ViewChild('cmd') input: ElementRef;

  static KEYCODE_UP: number = 38;
  static KEYCODE_DOWN: number = 40;
  static KEYCODE_ENTER: number = 13;

  public command: string;
  public last_command: string;

  constructor(private renderer: Renderer) {}

  ngAfterViewInit() {
    if (this.input) this.renderer.invokeElementMethod(this.input.nativeElement, 'focus');
  }

  /**
   * Handle keypresses, looking for special keys like enter
   * and arrows.
   * Other keys like letters, numbers, space, etc. will be ignored.
   */
  onKeyPress(event: KeyboardEvent, value: string) {

    switch (event.keyCode) {

      case CommandPromptComponent.KEYCODE_ENTER:  // enter key

        // if the user didn't type a new command,
        // run the last command
        if (value.length === 0) {
          value = this.game.history.getLastCommand();
        }

        // run the command
        let result = this.game.command_parser.run(value);

        // clear the input box
        this.command = "";
        this.last_command = value;

        break;

      case CommandPromptComponent.KEYCODE_UP:
        // up arrow moves back through the history
        let prev_command = this.game.history.getOlderCommand();
        if (prev_command !== null) {
          this.command = prev_command;
        }
        break;

      case CommandPromptComponent.KEYCODE_DOWN:
        let next_command = this.game.history.getNewerCommand();
        if (next_command !== null) {
          this.command = next_command;
        }
        break;

      // other keys have no special function.
    }
  }

}
Even though I used HTML form fields to build the user interface, the form is never submitted with a button. The same text field stays on the screen and is reused for every command.
Instead of using a "submit" button like a traditional form, then, I needed to listen for key presses inside the form field itself. This is possible using Angular's (keyup) binding:
<input #cmd (keyup)=onKeyPress($event, cmd.value) ... >
Whenever the <input> has the focus and a key is pressed, Angular calls the onKeyPress() method, which checks which key was pressed. This lets me check the key code and respond accordingly. Only the up and down arrows and the Enter key have any special function here; other keys just pass right through so that typing behaves normally.
You'll also notice this little snippet inside the component class:
ngAfterViewInit() {
  if (this.input) this.renderer.invokeElementMethod(this.input.nativeElement, 'focus');
}
This simply focuses the element when it's rendered on the page, so the player can just start typing.
In the next post, we'll take a look at some of the data structures in the game and see how Angular communicates with the underlying Django API.
For now, give Eamon Remastered a try and see how all this works. Or check out the full source code on GitHub.